在上文 电脑小白使用Shadowsocks搭建翻墙服务器傻瓜式手把手教程中,我们已经利用Bandwagonhost(搬瓦工)的VPS 搭建起自己的专属Shadowsocks翻墙服务器(小范围分享也可以,比如供自己家人或同事使用,但不建议公开在网上,很容易导致服务器被列入黑名单导致不可用,网上也有很多坏人会拿你提供的服务去干坏事。),在使用中,你可能会感觉速度不甚理想,可能会不如你之前购买的商家的服务。
这种情况是确实存在的,因为专业提供这类服务的商家都会提供与大陆物理距离近的国家的服务器,比如HK香港/JP日本/KR韩国等。我们购买的自己的服务器是在美国西海岸洛杉矶,和周边国家确实没得比。
这个速度慢表现在两方面,一是延迟,二是带宽。
延迟是因爱因斯坦的相对论(光速)限制着的,最快也不可能低于120ms,但实际上,这延迟对访问体验影响很小的,访问网页时加载网页的时间一般都比这个长得多,两秒内能完全打开的网站都算体验很好的,延迟的这不到1/5秒,基本可忽略不计。
带宽这个才是比较要命的,因中美之间宽带上限限制,虽然服务器的网络端口是1Gbps的,但实际上我们在中国使用它,可能连10Mbps都达不到,不到1%。
这个问题是有办法改善的,因为服务器是千兆网络,而我们实际在中国访问因网络拥塞只能使用1%的宽带,相当于有99%的的带宽都是闲置的。我们可能通过优化服务器采用更激进的发包策略来加快速度。例如 我们发送一个请求,正常情况下服务器会返回一个数据包,这个数据包可能因为网络拥塞而没有到达我们这,我们通知服务器说没有收到,服务器才会再次发送,这浪费了时间,也导致了速度上不去。优化过后,服务器会根据网络情况,掉包多时一次发送2个数据包,即使一个掉包了,还有一个会到达我们这。这样做也有一个缺点:会损耗更多的流量。
我们买的服务器最少都有500G/月的流量,个人正常使用几乎是不可能用完的。所以也大可别介意损耗更多流量。
介绍完优化加速原理,我们先来做个试验
之前已经搭建好的SS服务器,我们来看下Youtube上的4K视频,看其能达到的宽带是多少?
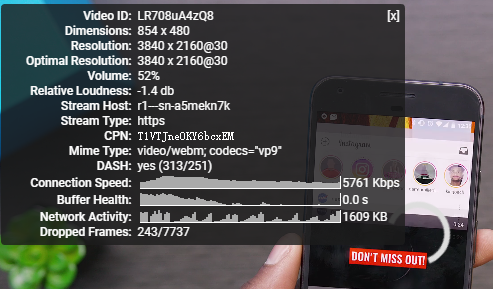
看到的情况,连接宽带在5Mbps-10Mbps之间跳,看1080P没问题,很流畅,但看4K就不行了,需要缓冲。
我们装好优化再来看看情况怎么样?
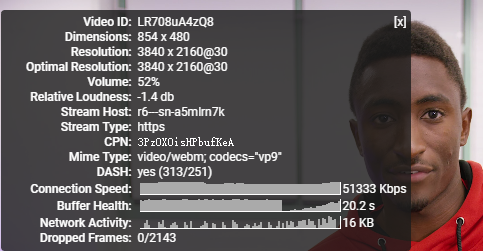
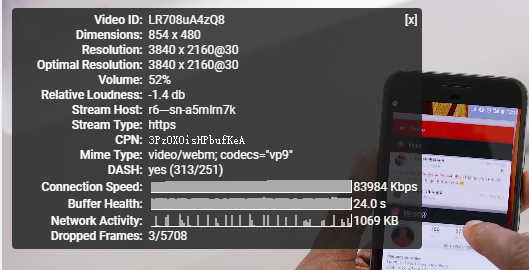
看到的情况,连接宽带很快就飙到了50Mbps以上,看了一会后更飙到了80Mbps以上,youtube 4K视频 即点即看,体验和未优化前有天壤之别。
效果这么好!你是不是也想要呢?没问题,下面开始优化教程,还是照例的傻瓜化操作^_^
准备工具
一台VPS
KVM、XEN、VMware或HyperV架构的,OpenVZ不支持换内核不适用此篇教程;搬瓦工确保你是默认的系统没有重装过别的系统,关键字 不再建议使用老旧的centos6系统,搬瓦工的机子请直接重装为ubuntu18.04,其已经默认开启了bbr,下面的内容你都不需要再看了!Centos 6 x86 KVM
其它家的VPS也建重装为ubuntu18.04或debian9以上版本,其内核已大概率直接支持bbr,可以直接启用。
一个SSH客户端–Xshell 现在有更好的替代品MobaXterm
本教程使用的加速方案是Google的开源TCP拥塞控制算法 BBR ,其主要解决两个问题
- 充分利用宽带
- 降低网络延迟
有兴趣了解原理的朋友可以看下这个链接
原版的BBR有兼顾网络公平,使用效果有,但可能快感不够,因为它是渐渐提升网速的,而不是一开始就直接怼到满速的。
我们这里使用其修改版(感谢 @Yankee 大佬),其发包策略更加激进,从一开始就给你满满的快感^_^,不再建议使用修改版,使用原版bbr也可以达到加快速度的目的
这里修改内核并启用BBR用的是秋水逸冰的一键包 感谢秋水大大提供如此优秀的一键包。
下面开始
- 先找到你的搬瓦工管理账号信息,在购买开通后搬瓦工已经把信息发到你的注册邮箱里了,去邮箱里找到如下邮件


- 打开已安装好的
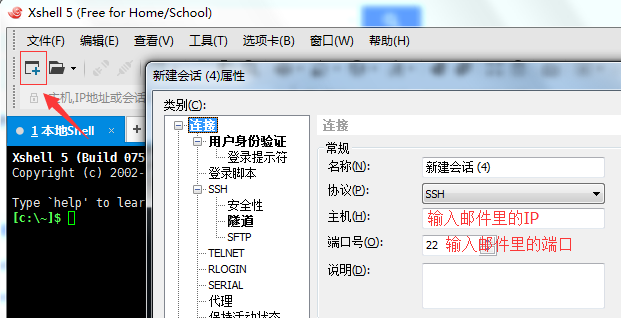
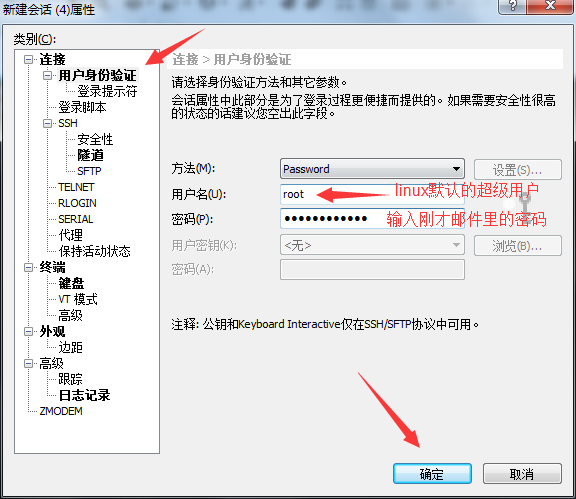
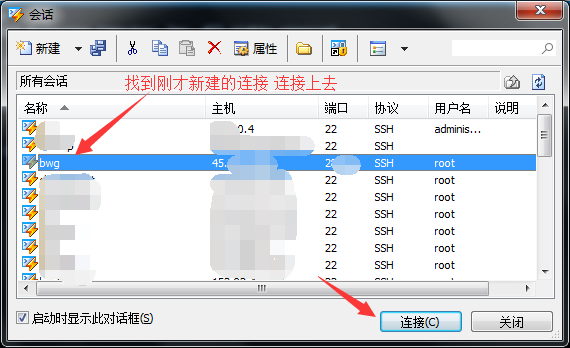
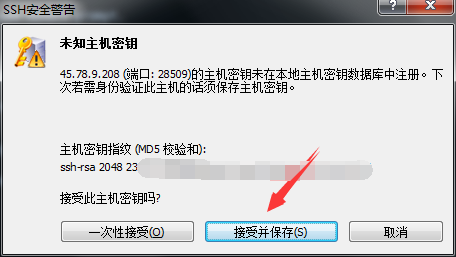
Xshell,新建连接-输入VPS信息-连接 如下图


- 输入如下命令
2017-09-18更新:近期发现评论区很多人说安装出错,根据提供的安装日志,发现是编译魔改块时出错了。一番查找,发现秋水逸冰修改内核的一键包默认安装最新版内核,而这个版本是一直在更新的。之前我安装时最新版内核是4.12,现在已经是4.13了,魔改版BBR只支持到4.12,4.13内核就会出现编译错误。我修改了秋水的一键包,使它指定安装4.12.10版内核,测试通过了,放出来。注意:修改过的这个脚本没有做系统适配,只适用于搬瓦工默认安装的CentOS6.9 i386(不带BBR)系统,别的系统请勿尝试,特别是64位系统,可能造成VPS系统内核损坏无法开机!— 2020-5-30 — 已更改为使用秋水逸冰原版BBR一键包,适配各种系统,请放心食用 🙂
apt update && apt install wget -y #debain及ubuntu安装wget
yum update && yum install wget -y #centos安装wget
wget --no-check-certificate https://github.com/teddysun/across/raw/master/bbr.sh && chmod +x bbr.sh && ./bbr.sh
命令输入完按回车键,会提示自动安装最新内核启用BBR,按任意键即开始安装。如下图
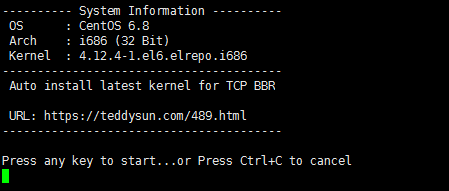
命令执行完后会提示需要重启,输入 y 按回车键重启VPS。如下图

注意VPS重启会断开连接,等大约30秒等VPS重启完成。
验证安装是否成功,输入如下命令
lsmod | grep bbr
有输出就代表安装成功了
OK, Enjoy it!



大佬,我在运行
wget –no-check-certificate https://github.com/teddysun/across/raw/master/bbr.sh && bash bbr.sh
出现了
Your VPS is based on OpenVZ, not be supported.
这个错误,怎么解决呀?
你的VPS不是KVM架构,是OPENVZ的,Openvz是不支持换内核的。
如果你是搬瓦工的VPS,可以在后台重装系统为支持BBR的CENTOS6,再直接运行
wget –no-check-certificate https://downloads.glorystar.me/bbr-m.sh && bash bbr-m.sh
不保证一定能成功哦。
KiwiVM主面板信息是这样的,它的系统是CENTOS6呀
localhost.localdomain [WAGON10G512M1T-CA] OVZ
Physical Location: US, California Node ID: xxx VPS ID: xxx
IP address: xx.xx.xx.xx
SSH Port: xxx
Status: Running (7 processes; LA: 0.00/0.00/0.00)
Actions: start stop reboot kill
RAM:
12.76/512 MB
SWAP:
8.57/64 MB
Disk usage (/):
0.67/10 GB
Bandwidth usage:
Resets: 2017-08-15
2.69/1000 GB
Operating system: Centos 6 x86
Hostname: localhost.localdomain
你买的Openvz架构的VPS,而本篇教程说得很清楚,要是KVM架构才行。
不过搬瓦工Openvz的VPS也提供使用BBR内核的的系统,你在后台后选择重装为带BBR的Centos后运行上次回复的命令试试。
如果你的VPS买了不满1个月,也可以发TK跟客服商量下能不能转成KVM架构的,如不行,直接申请退款另外购买KVM架构的,搬瓦工有提供1个月退款保证的。
yum update -y && yum install wget -y
wget –no-check-certificate https://github.com/teddysun/across/raw/master/bbr.sh && bash bbr.sh
执行这段命令时,只执行了yum update -y && yum install wget -y,然后再执行一次后面的,行吗?
不过后面的验证没像你那样显示,也没要我重启,这样行不行?帮忙解答一下,谢谢
第一行命令 更新列表并安装wget
第二行命令 下载bbr.sh一键包并执行
你可以先复制第一行粘贴,回车执行,再复制第二行粘贴,回车执行。
tcp_tsunami 20480 50 後面這個50是什么意思
依赖模块的个数,lsmod命令用于列出内核加载模块
速度变慢了…怎么办???有重装系统的教程?搬瓦工里的
看着教程,,重新搞了一边…好了,,,不过还是谢谢博主
完全照着做了一遍,在一大段内容的最后出现了
error: “No such file or directory” setting key “net.ipv4.tcp_congestion_control”
然后输入lsmod | grep tsunami无任何输出,这是哪里出问题了呀?
/etc/sysctl.conf 不存在?你的系统确定是搬瓦工默认的Centos 6 x86吗?
Operating system: Centos 6 x86 bbr
改成和我一样的系统环境吧 然后再试一遍
改系统后还是一样,过程如下
[root@host ~]# wget –no-check-certificate https://downloads.glorystar.me/bbr-m.sh && bash bbr-m.sh
–2017-09-06 10:48:05– https://downloads.glorystar.me/bbr-m.sh
Resolving downloads.glorystar.me… 162.220.14.112
Connecting to downloads.glorystar.me|162.220.14.112|:443… connected.
HTTP request sent, awaiting response… 200 OK
Length: 485 [application/octet-stream]
Saving to: “bbr-m.sh.1”
100%[===============================================>] 485 –.-K/s in 0s
2017-09-06 10:48:05 (73.4 MB/s) – “bbr-m.sh.1” saved [485/485]
Loaded plugins: fastestmirror
Setting up Update Process
Loading mirror speeds from cached hostfile
* base: mirror.lax.hugeserver.com
* elrepo: repos.lax-noc.com
* extras: mirror.sfo12.us.leaseweb.net
* updates: mirror.sfo12.us.leaseweb.net
base | 3.7 kB 00:00
elrepo | 2.9 kB 00:00
extras | 3.3 kB 00:00
updates | 3.4 kB 00:00
No Packages marked for Update
Loaded plugins: fastestmirror
Setting up Install Process
Loading mirror speeds from cached hostfile
* base: mirror.lax.hugeserver.com
* elrepo: repos.lax-noc.com
* extras: mirror.sfo12.us.leaseweb.net
* updates: mirror.sfo12.us.leaseweb.net
Package 1:make-3.81-23.el6.i686 already installed and latest version
Package gcc-4.4.7-18.el6.i686 already installed and latest version
Nothing to do
–2017-09-06 10:48:11– https://gist.github.com/anonymous/ba338038e799eafbba173215153a7f3a/raw/55ff1e45c97b46f12261e07ca07633a9922ad55d/tcp_tsunami.c
Resolving gist.github.com… 192.30.253.119, 192.30.253.118
Connecting to gist.github.com|192.30.253.119|:443… connected.
HTTP request sent, awaiting response… 301 Moved Permanently
Location: https://gist.githubusercontent.com/anonymous/ba338038e799eafbba173215153a7f3a/raw/55ff1e45c97b46f12261e07ca07633a9922ad55d/tcp_tsunami.c [following]
–2017-09-06 10:48:11– https://gist.githubusercontent.com/anonymous/ba338038e799eafbba173215153a7f3a/raw/55ff1e45c97b46f12261e07ca07633a9922ad55d/tcp_tsunami.c
Resolving gist.githubusercontent.com… 151.101.0.133, 151.101.64.133, 151.101.128.133, …
Connecting to gist.githubusercontent.com|151.101.0.133|:443… connected.
HTTP request sent, awaiting response… 200 OK
Length: 32858 (32K) [text/plain]
Saving to: “./tcp_tsunami.c”
100%[===============================================>] 32,858 –.-K/s in 0.001s
2017-09-06 10:48:11 (51.6 MB/s) – “./tcp_tsunami.c” saved [32858/32858]
make: Entering directory `/usr/src/kernels/4.13.0-1.el6.elrepo.i686′
CC [M] /root/tcp_tsunami.o
/root/tcp_tsunami.c:67: error: field ‘cycle_mstamp’ has incomplete type
/root/tcp_tsunami.c: In function ‘bbr_is_next_cycle_phase’:
/root/tcp_tsunami.c:387: error: implicit declaration of function ‘skb_mstamp_us_delta’
/root/tcp_tsunami.c: In function ‘bbr_reset_lt_bw_sampling_interval’:
/root/tcp_tsunami.c:473: error: request for member ‘stamp_jiffies’ in something not a structure or union
/root/tcp_tsunami.c: In function ‘bbr_lt_bw_sampling’:
/root/tcp_tsunami.c:579: error: request for member ‘stamp_jiffies’ in something not a structure or union
/root/tcp_tsunami.c: In function ‘bbr_update_min_rtt’:
/root/tcp_tsunami.c:707: warning: passing argument 2 of ‘before’ makes integer from pointer without a cast
./include/net/tcp.h:299: note: expected ‘__u32’ but argument is of type ‘u32 (*)(const struct tcp_sock *)’
/root/tcp_tsunami.c:712: warning: assignment makes integer from pointer without a cast
/root/tcp_tsunami.c:738: warning: assignment makes integer from pointer without a cast
/root/tcp_tsunami.c:745: warning: passing argument 2 of ‘before’ makes integer from pointer without a cast
./include/net/tcp.h:299: note: expected ‘__u32’ but argument is of type ‘u32 (*)(const struct tcp_sock *)’
/root/tcp_tsunami.c:746: warning: assignment makes integer from pointer without a cast
/root/tcp_tsunami.c: In function ‘bbr_init’:
/root/tcp_tsunami.c:793: warning: assignment makes integer from pointer without a cast
make[1]: *** [/root/tcp_tsunami.o] Error 1
make: *** [_module_/root] Error 2
make: Leaving directory `/usr/src/kernels/4.13.0-1.el6.elrepo.i686′
chmod: cannot access `./tcp_tsunami.ko’: No such file or directory
cp: cannot stat `./tcp_tsunami.ko’: No such file or directory
insmod: can’t read ‘tcp_tsunami.ko’: No such file or directory
net.ipv4.ip_forward = 0
net.ipv4.conf.default.rp_filter = 1
net.ipv4.conf.default.accept_source_route = 0
kernel.sysrq = 0
kernel.core_uses_pid = 1
net.ipv4.tcp_syncookies = 1
kernel.msgmnb = 65536
kernel.msgmax = 65536
kernel.shmmax = 4294967295
kernel.shmall = 268435456
net.ipv4.neigh.default.base_reachable_time_ms = 600000
net.ipv4.neigh.default.mcast_solicit = 20
net.ipv4.neigh.default.retrans_time_ms = 250
net.core.default_qdisc = fq
error: “No such file or directory” setting key “net.ipv4.tcp_congestion_control”
[root@host ~]#
把你的root账号信息发邮件给我,我有空上去给你看下
邮件已发,请查收。再次感谢!
你的问题解决了吗,我的和你的一模一样。。。重装之后还是同样的问题。
完全照做,系统都一样。运行 bbr没有问题,到了运行bbr-m.sh 就报错:
make: Leaving directory `/usr/src/kernels/4.13.2-1.el6.elrepo.i686′
chmod: cannot access `./tcp_tsunami.ko’: No such file or directory
cp: cannot stat `./tcp_tsunami.ko’: No such file or directory
insmod: can’t read ‘tcp_tsunami.ko’: No such file or directory
net.ipv4.ip_forward = 0
net.ipv4.conf.default.rp_filter = 1
net.ipv4.conf.default.accept_source_route = 0
kernel.sysrq = 0
kernel.core_uses_pid = 1
net.ipv4.tcp_syncookies = 1
kernel.msgmnb = 65536
kernel.msgmax = 65536
kernel.shmmax = 4294967295
kernel.shmall = 268435456
net.ipv4.neigh.default.base_reachable_time_ms = 600000
net.ipv4.neigh.default.mcast_solicit = 20
net.ipv4.neigh.default.retrans_time_ms = 250
net.core.default_qdisc = fq
error: “No such file or directory” setting key “net.ipv4.tcp_congestion_control”
看了下 bbr-m.sh的内容:
#/bin/bash
yum update
yum install -y make gcc
wget -O ./tcp_tsunami.c https://gist.github.com/anonymous/ba338038e799eafbba173215153a7f3a/raw/55ff1e45c97b46f12261e07ca07633a9922ad55d/tcp_tsunami.c
echo “obj-m:=tcp_tsunami.o” > Makefile
make -C /lib/modules/$(uname -r)/build M=`pwd` modules CC=/usr/bin/gcc
chmod +x ./tcp_tsunami.ko
cp -rf ./tcp_tsunami.ko /lib/modules/$(uname -r)/kernel/net/ipv4
insmod tcp_tsunami.ko
depmod -a
sed -i ‘s/bbr/tsunami/g’ /etc/sysctl.conf
sysctl -p
exit
对比上面的错误日志“chmod: cannot access `./tcp_tsunami.ko’: No such file or directory”,可以看到他运行到chmod 这一行就出错了,找不到tcp_tsunami.ko这个文件。我也是小白,不知道上面的理解对不对。
现在只能用bbr的策略,加速还是有的,只是是逐渐加速,也能到15~16mbps。无法更高了。
我不知道 tcp_tsunami.ko这个文件复制一份到我的vps里面能不能用?楼主能发一份给我试试吗?我的邮箱提交评论的时候留了,就不在这里留了。
谢谢了。
运行这两个命令看看输出什么?我怀疑你的系统并非默认的CENTOS6.9 I386
cat /etc/issue
uname -r
[root@host ~]# lsmod | grep bbr
tcp_bbr 20480 5
[root@host ~]# lsmod | grep tsunami
[root@host ~]# cat /etc/issue
CentOS release 6.9 (Final)
Kernel \r on an \m
[root@host ~]# uname -r
4.13.2-1.el6.elrepo.i686
[root@host ~]#
以上是我的系统输出,请过目。
找到问题了,秋水逸冰修改内核的一键包默认安装最新版内核,之前我安装时最新版内核是4.12,鸡血版BBR只支持到4.12,4.13内核就会出现编译错误,我正在修改秋水的一键包,弄好后放出。
折腾过程可见 https://glorystar.me/archives/CentOS6-9-make-install-gcc-4-9.html
[root@host ~]# cat /etc/issue
CentOS release 6.9 (Final)
Kernel \r on an \m
[root@host ~]# uname -r
4.13.2-1.el6.elrepo.i686
额,我的是i686,大师,这个要咋整。。。谢谢回答。
问题已修复,请重装系统后再进行安装。
ok了,安装成功了。
有一个小问题:wget –no-check-certificate https://downloads.glorystar.me/bbr-m.sh 这个显示404. 我用的是之前本地存的一个bbr-m.sh。
另外,不知道是不是我网络的原因,我这边50m的宽带,用了修改过的bbr后YouTube看4k还是只有10m,还没有之前用bbr快。。。不过反应速度倒是比之前用bbr快了一些。正好这两天准备升级100m的宽带,到时候再试试。
谢谢大师了。
博主,我都装好了,测试也通过了,为什么速度还是在4M左右,4k看不了
这个也得看你本地网络环境是否给力的。一般三大运营商的宽带都没问题 如果是二级承包商 如长宽 有线电视这些可能就会有问题。
兄弟,真不知道你买的啥机器,我买的搬瓦工,
SPECIAL 20G VZ PROMO V3 – LOS ANGELES – CHINA DIRECT ROUTE
SSD: 20 GB RAID-10
RAM: 1 GB
CPU: 1x Intel Xeon
Transfer: 2000 GB/mo
Link speed: 1 Gigabit
Location: Los Angeles (no other locations available on this plan)
Direct route via China Telecom and China Unicom
但是我看 youtube,Connection Speed 就没超过 500 的,时好时坏,我都准备退款了,真不知到你家截图上的 8000 多,甚至更高的是怎么来的。
这阵搬瓦工网络确实不怎么稳,我刚刚测试也只有4Mbps左右,要求高的话可以看看阿里云香港的VPS,下面是我的测试截图

兄弟,我给你发了封邮件,盼望回复
安装魔改BBR时候报错,已经确认系统是正确的了
2017-10-11 11:36:56 (35.9 MB/s) – “./tcp_tsunami.c” saved [32858/32858]
make: *** /lib/modules/2.6.32-642.el6.i686/build: No such file or directory. Stop.
chmod: cannot access `./tcp_tsunami.ko’: No such file or directory
cp: cannot stat `./tcp_tsunami.ko’: No such file or directory
insmod: can’t read ‘tcp_tsunami.ko’: No such file or directory
执行以下命令看看输出是什么
uname -r
请教下 博主,我的vultr搭建好之后也是看视频很卡,加速器安装不了,说是不匹配内核。
输完前两个命令之后都提示安装成功,但是并没有提示重启,然后执行wget –no-check-certificate https://downloads.glorystar.me/bbr/bbr-m.sh && bash bbr-m.sh, 就会提示找不到文件,输入lsmod | grep tsunami 也没有任何输出, 是KVM的,博主求教。
大佬我执行wget –no-check-certificate https://downloads.glorystar.me/bbr/bbr-m.sh && bash bbr-m.sh, 就会提示找不到文件
请问下OPENVZ有没有加速的好办法?
github上面搜索下 openvz bbr 有现成的一键包的。
确实快了很多,十分感谢!!!
Pingback引用通告: 墙越来越高,如何升级翻墙工具?这是一篇全面的指引。 - 荣耀之星
Pingback引用通告: 购买RUVDS 780卢布年付的VPS教程 - 荣耀之星